shaved asparagus pizza.
May 22, 2014 § 2 Comments
My new favorite.

To set the scene: It was a Sunday afternoon. Ty and I had spent several hours cleaning out closets and piling up clothes for Goodwill. Around 5:30, we realized we were starving.
I remembered that we had a pile of freshly picked asparagus on the counter–the perk of a long-ago-planted asparagus patch in our backyard.
20 minutes later, this pizza was in the oven.
15 minutes later, it was being devoured.
Just do it!
Shaved Asparagus Pizza
Recipe from Smitten Kitchen (with some adjustments)
What you need:
- one refrigerated thin pizza dough
- medium bunch of asparagus
- 1/4 cup grated or shaved Parmesan
- 2 cups low-fat mozzarella cheese, shredded
- roughly two tablespoons of olive oil
- dash of sea salt and black pepper
- 1 green onion, thinly sliced
- 1/2 lemon (optional)
- dash of red pepper flakes (optional)
- 2-3 minced garlic cloves (optional)
What to do:
Preheat your oven to 450 degrees.
Rinse and dry your asparagus. Holding the thick end of the asparagus, shave long, thin strips using a peeler. There is no perfect way to do this, and it doesn’t really matter if the sizes or thickness of your pieces are uneven.
Place the strips in a bowl and toss with the drizzle of olive oil and dash of sea salt and black pepper. I also added a sprinkling of red pepper flakes for a little kick.

Set aside the bowl momentarily. Time to stretch out and prepare your pizza dough.
I used dough from Trader Joe’s. When I prepare it, I stretch it out on a lightly floured cutting board. Then I transfer the dough to a cookie sheet that I have drizzled with olive oil.
Once the dough is ready, spread the Parmesan cheese evenly. Then, spread the Mozzarella cheese.
Layer your shaved asparagus on top. If you are choosing to add garlic (and why would you not!?!) now is the time to sprinkle on the minced garlic.

Quick close up!

Put the pizza in the oven and bake for 15 minutes at 450 degrees. As soon as you take it out of the oven, sprinkle on your sliced green onion. I squeezed the juice of half a lemon on top for added flavor.

Admire it for a second, then slice & eat!

We ate this so fast that I thought it was a dream. Luckily I have these photos.

CLOSE UP ACTION.
easy fajitas with grilled chicken, peppers, and onions.
April 21, 2014 § 3 Comments
So, to tell you the truth, I am exhausted. Ty & I have been house hunting for several months, and last week involved several nights spent with our realtor. It’s so much more of an emotional process than I had anticipated! Lots of excitement followed by let downs… But my fingers are crossed that something good is just around the corner!
In the meantime, I’m counting on simple recipes like this one to get me through some hectic weekdays. I’ve made double batches of these fajitas twice in the last two weeks to give us some great leftovers!

Easy Fajitas with Grilled Chicken, Peppers, and Onions
Recipe from Smitten Kitchen with minor changes
What you need:
- 1 and 1/2 pounds boneless chicken breasts
- 2 tablespoons lime juice
- 1 and 1/2 teaspoon salt
- 1 and 1/2 teaspoon dried oregano
- 2 teaspoons ground cumin
- 1 minced garlic clove
- 1 teaspoon cayenne pepper
- 1/2 teaspoon smoked paprika
- 6-8 flour or corn tortillas
- drizzle of olive oil
- 3-5 assorted bell peppers (2-3 large or 4-5 small) – can be red, green, yellow, or orange
- 1 large sweet onion
- shredded cheese and/or sour cream, for topping

What to do:
Start by preparing your chicken. I like to trim excess fat off of my chicken breasts before thinly slicing them in 1/2 inch strips. Put the strips into a plastic freezer bag. In a bowl, combine the lime juice, salt, oregano, cumin, minced garlic, cayenne pepper, and smoked paprika. Pour over the chicken strips. Seal bag tightly and place in fridge for at least 30 minutes. (This can also marinate overnight!)
Peel and slice your onion into very thin strips. Cut your bell peppers into thin strips, as well, removing seeds and stem.  Heat a very large skillet over a high heat. (You want this pan HOT.)
Once skillet has heated, drizzle with olive oil to coat. Place your sliced bell peppers in one layer on the skillet. Allow them to cook for several minutes without touching them–resist the urge to flip them! Turn one over as a test to see if its begun to char. If so, flip. Sear the other side until brown. Then, add the onions. Also allow them to char and turn golden. Once the onions have softened, remove the entire onion and pepper mixture from the pan and set aside in a bowl. Add another drizzle of olive oil to the pan. Add the sliced chicken strips in a single layer. Cook for 4-5 minutes on one side, then flip. Cook for another 5 minutes on the other side. Chicken should be browning. Once chicken is cooked, add the onion and pepper mixture back into the skillet and toss well. When you are ready to serve, remove the skillet from heat.
I warmed my tortillas on a grill pan until they were slightly charred. Spoon a generous serving of the chicken fajita mixture onto each tortilla.
 After snapping these photos, I topped my fajitas with shredded cheese and sour cream. (You could add other toppings, to your liking, like salsa, corn, black beans, cilantro, slaw, etc.)
Enjoy!
barley soup with turkey sausage, swiss chard, and shaved parmesan.
April 7, 2014 § Leave a comment
The calendar may say spring, but I’m not buying it. We haven’t quite let go of winter just yet. And for these lingering cold days when you’re in need of a hearty, warm lunch or dinner, may I suggest this barley soup? It is good and good for you, simple, and tasty.

Top it with some shredded or shaved cheese and serve with some crusty bread. Or just eat it like this. I don’t care. You will like it, I promise.

Barley Soup with Turkey Sausage, Swiss Chard, and Shaved Parmesan
Recipe from Climbing Grier Mountain (with adaptations)
What you need:
- 1 pound of turkey sausage
- 1 yellow onion, chopped
- 1 fennel bulb, chopped [remove leaves and stem]
- 2-3 carrots, chopped
- 1 tablespoon olive oil
- 1 and 1/2 cup barley [I used 1 package of Trader Joe’s 10 Minute Barley]
- 1/2 teaspoon red pepper flakes
- 2 quarts chicken broth
- 4 generous cups of cleaned and chopped Swiss chard
- 1 15-ounce can garbanzo beans, rinsed and drained
- shaved Parmesan, for topping
What to do:
Finely chop your onion, fennel, and carrots. In a large Dutch oven, heat olive oil to medium high heat. Add the turkey sausage, and cook until browned. I let the sausage cook for about 10-12 minutes. Then, add the chopped veggies and saute until soft, 5-6 minutes. Add the barley and red pepper flakes. Cook for about 5 minutes, then add the broth. Bring the pot to a boil, then turn to low heat and let the soup simmer for 35 minutes. Add the chopped chard and rinsed & drained garbanzo beans, and cook for an additional 15 minutes. Remove soup from heat. Serve with a spoonful of shaved Parmesan cheese.

Note: This was my first recipe with fennel. It’s been described as having a licorice taste, but I found it to be lightly minty. Once it was chopped, sauteed, and mixed into the soup, I couldn’t even distinguish it. But it’s apparently packed with nutrients: fiber, Vitamin C, antioxidants. Still, if you are leery, or can’t find fennel in your grocery store, just use add more carrots or a finely chopped stalk of celery. Whatever floats your boat will work well in this soup.

ZOOMED IN GOODNESS.

One last picture because I am new-camera-happy.
sloppy joes with bacon and simple slaw.
April 2, 2014 § Leave a comment
I got a new camera, finally–my first since 2008! A Canon EOS Rebel 3Ti! In full disclosure, I haven’t the slightest idea how to use it. I am just beginning to read the manual and surf through the dozens of buttons and shooting options. But I managed to attach the lens and take some photos using the automatic setting.
To celebrate this I made some pretty epic sloppy joe sandwiches.
I should probably mention that prior to making these sandwiches, I refused to eat sloppy joes. I used to think of it as a mysterious beef mixture, and I just didn’t want any part of it. That might be because I hadn’t made it myself–I didn’t see how the beef was seasoned and browned; how the sweet and tangy sauce was whisked and boiled. And, I didn’t realize the potential of using a lightly toasted pretzel bun and some bacon hot off the griddle. Oh.my.goodness.

Then I decided it needed just a little something more. So I made a super quick slaw and added a scoop on top.

Um, YES.
My personal advice: Don’t be scared of the Sloppy Joe.
Sloppy Joe’s with Bacon and Simple Slaw
Adapted from Simply Scratch [I followed her family recipe for the sloppy joe meat, but made some substitutions based on what I had in my pantry! In parens, I noted if I used something different.]
What you need:
- 1 tablespoon bacon fat or olive oil
- 1 yellow or red onion, diced
- 1 and 1/2 pounds ground beef, thawed/uncooked
- 1 and 1/2 cups, ketchup
- 1/4 cup water
- 1/2 tablespoon white vinegar (or white balsamic vinegar)
- 2 tablespoons sugar
- 3/4 tablespoon yellow mustard (or honey mustard)
- 1/2 teaspoon salt
- dash of black pepper
- dash of paprika
- 4 large hamburger buns or rolls (used pretzel rolls from Trader Joe’s)
- 6 slices of bacon
- 3-4 cups prepared cabbage coleslaw mix
- 2 green onions, sliced
- 1-2 tablespoons low-fat mayonnaise (could also use ranch dressing)
What to do:
Begin by heating a skillet over medium heat. Cook your bacon until crisp, then drain on paper towels. Set aside. Reserve one tablespoon of the liquid from the skillet.
Heat a nonstick Dutch oven or stockpot over medium heat. Add the reserved tablespoon of bacon fat (if you don’t want to use the fat, you can use one tablespoon of olive oil. but trust me that the bacon fat adds amazing flavor!)
Add your chopped onion to the pot and cook until golden, about 5-8 minutes. Then, add the ground beef. Allow the beef to cook until it begins to brown. I let my beef cook for about 15 minutes, stirring often and breaking up the meat with a wooden spoon.
While the beef is cooking, you can make your Sloppy Joe sauce. In a small bowl, add your ketchup, water, vinegar, sugar, mustard, salt, pepper, and paprika. Mix well. Set aside.
Also prepare your simple slaw: Mix the prepared slaw with your chopped green onions and a tablespoon of mayonnaise. Less is more–you can always add more mayo if you need it. Set aside.
Turn your attention back to the beef! Once the beef is fully cooked, remove it from the pot using a slotted spoon. I transferred the beef/onion mixture to a large bowl, allowing the grease to drain. Once all meat has been removed, drain the grease and discard.
Return the meat to the pot. Pour in the sauce. Stir well to combine. Allow the beef and sauce to come to a boil, then turn the heat to low and simmer for 20 minutes. After the beef has simmered, let it cool slightly before preparing your sandwiches.
Slice your rolls in half and warm on a grill pan for 2-3 minutes. Top rolls with a heaping serving of Sloppy Joe mixture, a piece or two of bacon, and spoonful of slaw.
CHOW DOWN.

An added bonus for you–the first official food photo taken with my new camera.
I call this Ty meets Sloppy Joe.
Note: This recipe could make 6 reasonably portioned sandwiches. But with this guy around, I got about 3 massive sandwiches from one recipe.
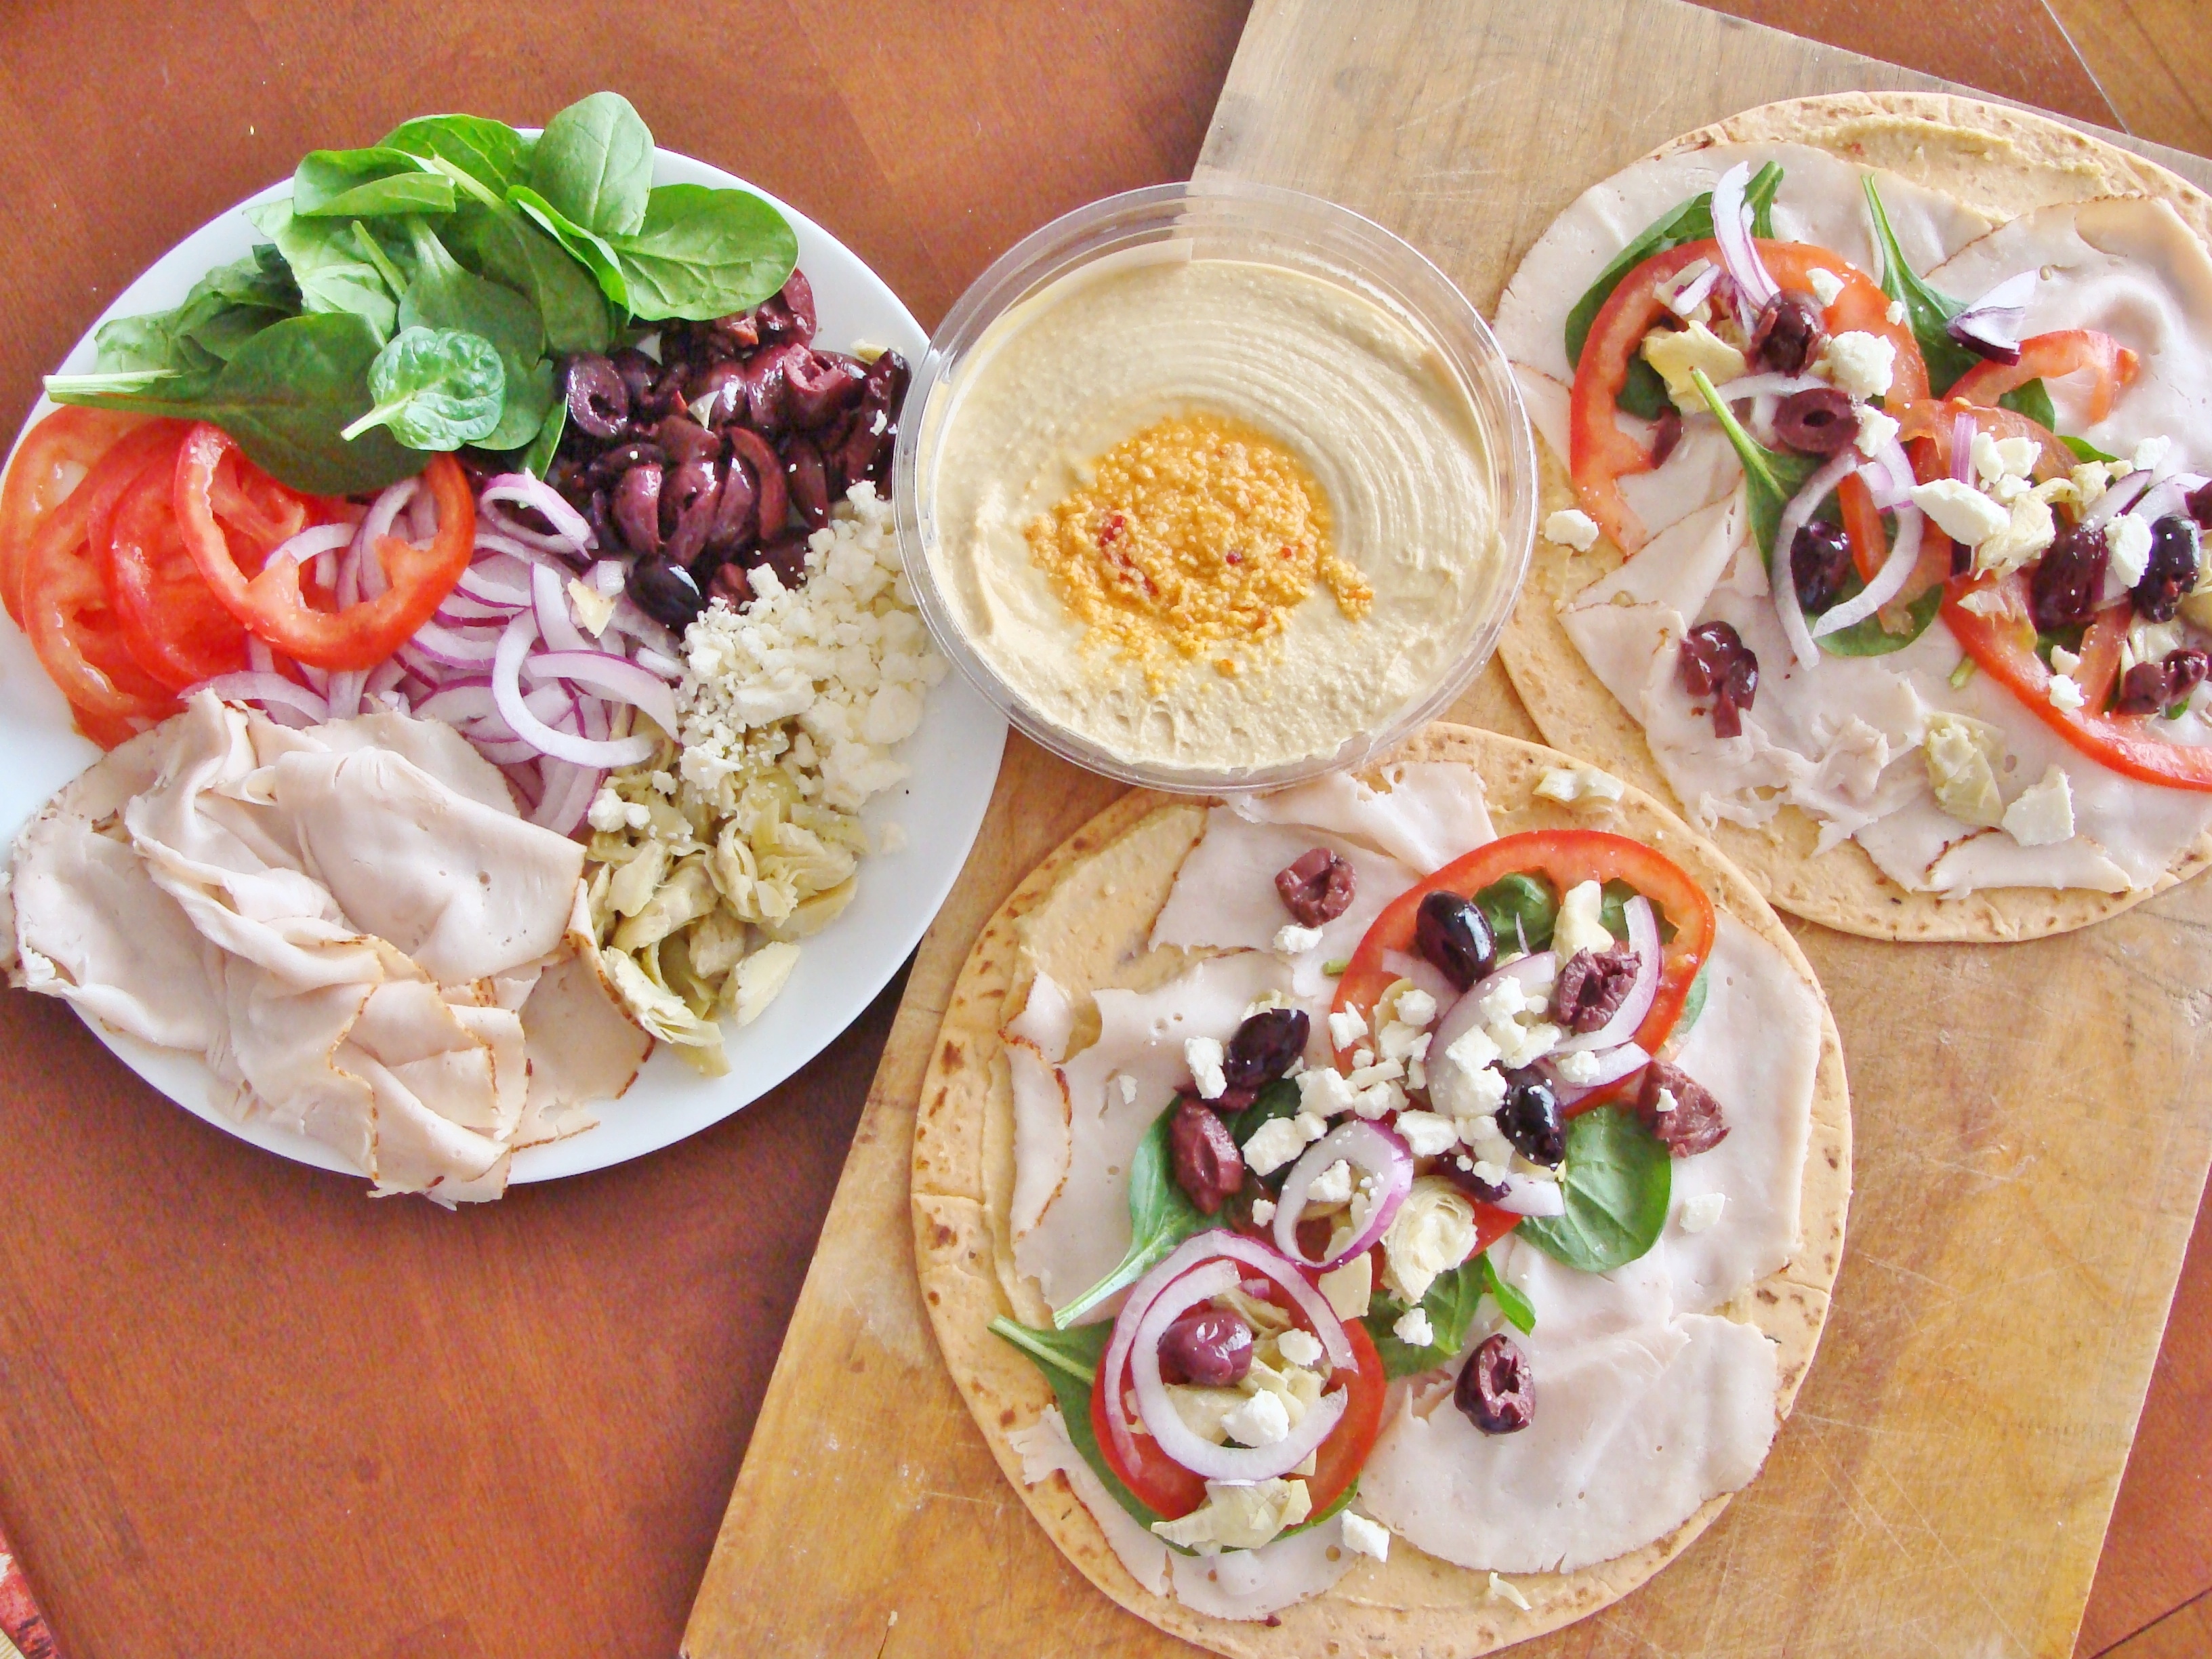
mediterranean turkey wraps.
March 23, 2014 § 2 Comments
The best way to get through a mundane 8-5 work day? An exciting lunch.
exciting for me = colorful, flavorful, healthy, filling.
I was in a real lunchtime rut until a search turned up this recipe from Iowa Girl Eats for quick Greek-inspired turkey lunch wraps. I made them last week and ate one every day. They were so delicious that I made them again for this week! I’m sure I will wear them out soon, but for now, I’m enjoying them. You can totally customize these to your liking–below is what I used!
Mediterranean Turkey Wraps
Idea and Recipe adapted from Iowa Girl Eats
What you need:
- 5-6 tortillas (I use Giant Eagle brand Tomato Basil and love them!)
- hummus (I used La Sabra’s Roasted Garlic–could also use an olive, sun-dried tomato, or plain flavor)
- 3/4 cup feta cheese, crumbled
- 2 tomatoes, sliced thin, seeds removed
- 1/4 red onion, sliced thin
- 1 cup fresh spinach
- 1 small jar of marinated artichoke hearts (I used DeLallo)
- 1/2 cup seedless kalamata olives, chopped
- 3/4 pound deli turkey (I used Dietz & Watson low-sodium turkey breast, shaved)
Note: The tortillas I bought came in a pack of 6, so I made 6 wraps. You can make more or less depending on how full you want yours to be!

What to do:
Prep your ingredients first. Slice your tomatoes as thinly as you can, and push out the seeds and goop. (You don’t want your sandwiches to get soggy in the fridge from the tomato juices.) Also slice your red onions. Chop your kalamata olives. I drained my artichoke hearts and lightly patted them with a paper towel, to absorb some of the moisture. Then, I chopped them up, too.
Now, to prepare each wrap:
Set out one tortilla on a cutting board or other surface. Spread one tablespoon of hummus over the entire tortilla. Layer on 3-4 slices of turkey. Top with several slices of tomato and red onion, a handful of chopped kalamata olives and artichoke hearts, several spinach leaves, and a sprinkling of feta cheese.

Roll the wrap as tightly as you can, and slice in half.

I wrapped my wraps (ha!) in wax paper, then put in individual baggies. I make a little lunch “station” in my fridge with my wraps and grapes ready to go and easy to pack in the morning. I feel like I am winning at lunch right now. It’s nice.

smoky chicken chili.
March 11, 2014 § Leave a comment
I thought maybe I’d waited too long to share this recipe. I thought, yesterday, Spring is here. No one wants any more cold weather comfort food. But then, I saw the forecast for Wednesday. Five to eight inches of snow. And I may have cried. But then I thought…
CHILI TIME!

I know I shared a recipe for a white bean chicken chili last month. (It’s excellent.) This recipe for smoky chicken chili has a completely different flavor profile. It has a deep, smoky, lingering spiciness, the result of slow cooking the onions and allowing the chicken to absorb the spices. It takes just a little extra time, but it’s definitely worth it. Also, if you don’t have smoked paprika, I highly suggest you get some to use for this recipe. (I know they sell it at Trader Joe’s!) It really makes the difference, and I don’t believe that regular paprika will have the same effect.
Smoky Chicken Chili
Recipe from How Sweet Eats, on the Tasty Kitchen blog
What you need:
- 4 slices of bacon, chopped
- 1 large yellow onion, diced
- 3 cloves of garlic, chopped
- 1 rotisserie chicken, shredded
- 1 teaspoon smoked paprika
- 1 teaspoon cumin
- 1 teaspoon onion powder
- 1/2 teaspoon garlic powder
- 1/2 teaspoon cayenne pepper
- 6 cups low-sodium chicken broth
- 1 28-ounce can roasted diced tomatoes
- 4 14.5-ounce cans white beans (use cannellini or Great Northern or both)
- 2 4-ounce cans of diced green chilis
- 1 cup low-fat mozzarella cheese (for topping)
- 1/4 cup fresh cilantro (for topping)
What to do:
In a large stockpot, cook the chopped bacon for 3 minutes. Add the chopped onion and garlic to the bacon and continue to cook, stirring frequently, for 30 minutes. The onions should begin to caramelize and brown.
Now, add the shredded chicken, smoky paprika, onion powder, garlic powder, and cayenne pepper to the pot. Cook for 10 minutes, stirring and pressing the spices into the chicken with a wooden spoon. This helps to infuse the chicken with flavor.
Finally, stir in the chicken broth, diced tomatoes, beans, and green chilis. Allow the chili to come to a slow, rolling boil. Simmer for 20 minutes or so, until the liquid reduces.
Top bowls with some shredded mozzarella and fresh cilantro, if you like. I liked this chili just as well without any extra toppings. Enjoy!

I hope this makes you feel better about this never-ending winter. It makes me feel better.

simple grilled fish tacos.
March 5, 2014 § 2 Comments
I’m not sure if many people crave fish tacos in the winter, but I did. Granted, I have only had fish tacos once, and the fish was lightly battered and fried (let’s be real: that’s my preferred fish preparation). I was mostly craving something light and flavorful. I also wanted to experiment for the first time with tilapia, a mild white fish.
I did a lot of research (on Pinterest) and put together this quick grilled fish taco recipe. I think this is a great option for nights when you don’t have much time to cook, but want something delicious and healthy. The sauce is key!
 Simple Grilled Fish Tacos
What you need:
For the sauce:
- 1/2 cup low-fat sour cream
- 1/2 cup reduced fat mayonnaise
- 1 tablespoon lime juice
- 1/2 teaspoon cumin
- 1/2 teaspoon dill
- 1/2 teaspoon oregano
- 1 teaspoon adobo sauce (optional)
For the fish:
- 1.25 pounds tilapia filets
- 1 clove garlic, minced
- 1/4 cup olive oil
- 1 teaspoon garlic powder
- 1 teaspoon cumin
- 1 teaspoon oregano
- 1/4 teaspoon paprika
- 1/4 teaspoon cayenne pepper
For serving:
- 6 flour tortillas
- 1 cup shredded cabbage
- 2 green onions, thinly sliced
What to do:
In a small bowl, mix the olive oil, minced garlic, garlic powder, cumin, oregano, paprika, and cayenne pepper. Put the tilapia filets in a dish or bowl and season both sides with black pepper and salt, then pour the marinade over the fish. Let the fish marinate for at least 15 minutes in the fridge.

Meanwhile, prepare your sauce. In a small bowl, mix the sour cream, mayonnaise, lime juice, cumin, dill, and oregano. If you want an extra kick of spice, add one teaspoon of adobo sauce (taken from a can or jar of adobo peppers).
After the fish has marinated, heat a grill pan over high heat. Grill the tilapia for 2-3 minutes, then flip, and continue to cook for 2-3 minutes.

Tilapia cooks very quickly. I broke the fish apart with a spatula to ensure it cooked through.

Once the fish is cooked, you just need to assemble your tacos! Warm the tortillas in a skillet until they begin to brown. Top with a scoop of the sauce, then fish, then green onions and cabbage.
This recipe produces 6 tacos: enough for 2 hungry people!

Stay tuned for future fish taco experimentation: perhaps battered cod!

golden mashed potato bake.
February 28, 2014 § 1 Comment
I’m rather unapologetic when it comes to my love of french fried onions. These unassuming little crispy bits are so super satisfying. I have been known to accidentally, ahem, scoop them off the top of casseroles, leaving other servings sadly onion free. Oops! My bad!
That, ladies and gentlemen, is the joy of cooking for yourself. You can scoop up ALL the french fried onions from this potato bake! Muahahaha.

Anyways. They aren’t the only reason I made this dish. But they played a major role.
This is a classic, feel good, warm and fuzzy recipe from Taste of Home. Kudos to my Mom for finding it, and making it for me the first time.
I love the combination of Russet and sweet potatoes.

Golden Mashed Potato Bake
Recipe from Taste of Home
- 4 medium Russet potatoes, peeled and cubed
- 4 medium sweet potatoes (not yams), peeled and cubed
- 1 8-oz package of reduced fat cream cheese, cubed
- 2 eggs
- 2 tablespoons all-purpose flour
- 2 teaspoons dried parsley flakes (or 2 tablespoons chopped fresh parsley)
- 2 tablespoons minced chives
- 2 teaspoons salt
- 1 teaspoon pepper
- 1 2.8-oz can french fried onions
What to do:
Peel and cube your potatoes.
Place them in a very large stockpot and add enough water to cover. Bring the potatoes to a boil. Reduce heat, then cover and simmer for 20 minutes. Test potatoes with a fork to see if they are tender. Drain.
Preheat your oven to 350 degrees.
In a large bowl or in the stockpot, blend the cubed cream cheese into the potatoes until smooth. Then beat in the eggs, flour, parsley, chives, salt and pepper. I used a potato masher and easily mixed everything by hand.
Transfer the potatoes to a nonstick or greased 3-qt baking dish. Bake uncovered for 45 minutes.
Carefully remove the dish from the oven and sprinkle the potatoes with the French fried onions. Bake for 5-10 more minutes, until top begins to brown.

Note: This makes 8-10 generous servings. My mom also noted that this recipe freezes well – just leave out the French fried onions until you are ready to reheat and serve.

P.S. When in doubt, just add more french fried onions.

carrot coconut soup.
February 25, 2014 § 2 Comments
News flash: It’s still winter.
Maybe it was a dream, but this past Saturday I took a long walk with my Mom in near-60 degree sunshine. The strange, glorious warmth was a reminder that Spring is coming. And also that I am really, really pale. It happens.
For now, I’m still meandering around the house moaning about how cold I am (“Toughen up!” says Ty), snuggling up in fleece blankets, sipping the occasional (nightly) glass of wine, and making pot fulls of soup and chili.
Like this Carrot Coconut Soup! Quick soups like this are the best.

For such a simple soup, it packs a lot of flavor and spicy kick. Also, I love a bright, orange soup!
Carrot Coconut Soup
Recipe directly from Shutterbean (with just the teensiest of modifications)
I found this serves 2-3 generously – double if you want leftovers!
What you need:
- 4 tablespoons butter (unsalted)
- 1 pound of carrots, peeled & chopped
- 1 medium onion, chopped
- 2 cups chicken broth (fat-free & low sodium)
- 1 14 oz. can low-fat coconut milk
- 1 tablespoon sambal oelek (found in the Thai section of your grocery)
- sriracha sauce
- fresh cilantro (optional for topping)
What to do:
As always, prep work first! Peel and chop your carrots. Peel and chop your onion. Done!
Heat a large saucepan over medium heat. Add the butter and let it melt. Once butter has melted, add the chopped carrots and onion. Season with salt and black pepper. Continue to stir until carrots are softened. This will take about 20 minutes. Now, stir in the chicken broth and coconut milk. Also add the tablespoon of sambal oelek, if desired. Bring the soup to a boil, then reduce the heat and let it simmer for about 45 minutes. Vegetables should become very soft.
Remove the soup from heat, then puree with an immersion blender. Serve the soup with a dash of sriracha and cilantro.

Note: If you don’t want the soup to be too spicy, but still want some kick, eliminate the sambal oelek. If you want a mild, sweet carrot soup, skip the sambal oelek and sriracha altogether.

Enjoy!
white bean and chicken chili.
February 17, 2014 § 2 Comments
I’ve been living in Northeast Ohio now for a little over five months. In the late summer and early fall, I worried a lot about what winter would be like in the snow belt, especially considering I drive a little (cute) Honda Fit. So far, I’ve only had one or two truly scary commutes to work and my car’s doing better than I expected. The constant brutal cold temps and the seemingly constant snow showers have started to wear on me, but I kinda think that about half our country is in the same boat.
In the past, I’ve struggled to stay positive through winter. I miss the sunshine and being about to jog and hike outdoors without freezing my nose and toes. I have to say, I’ve surprised myself this winter. I do have a strong partner in Ty; I guess I’ll give him some (tons) of the credit for keeping my spirits up. As much as I loved living in Columbus, I also love living here. It really is a beautiful place, even snow-covered.

I took these photos on the coldest day in Cleveland in 20 years. Wind chills reached -35 below.
(-35 is not beautiful. In case you were wondering.)

Needless to say, this is optimal time for chili cooking. I’ve been churning through a list of different recipes to figure out which ones we like the best. This was one of the first I made: quick white bean and chicken chili. I have a clipping of this recipe that my mom gave me from The Columbus Dispatch a few years ago. The article is titled, “Quick chili stands out as gift,” and says the chili is ready in “20 minutes flat.” I agree: This is a perfect recipe to double and serve to family and friends. It also comes together really fast.
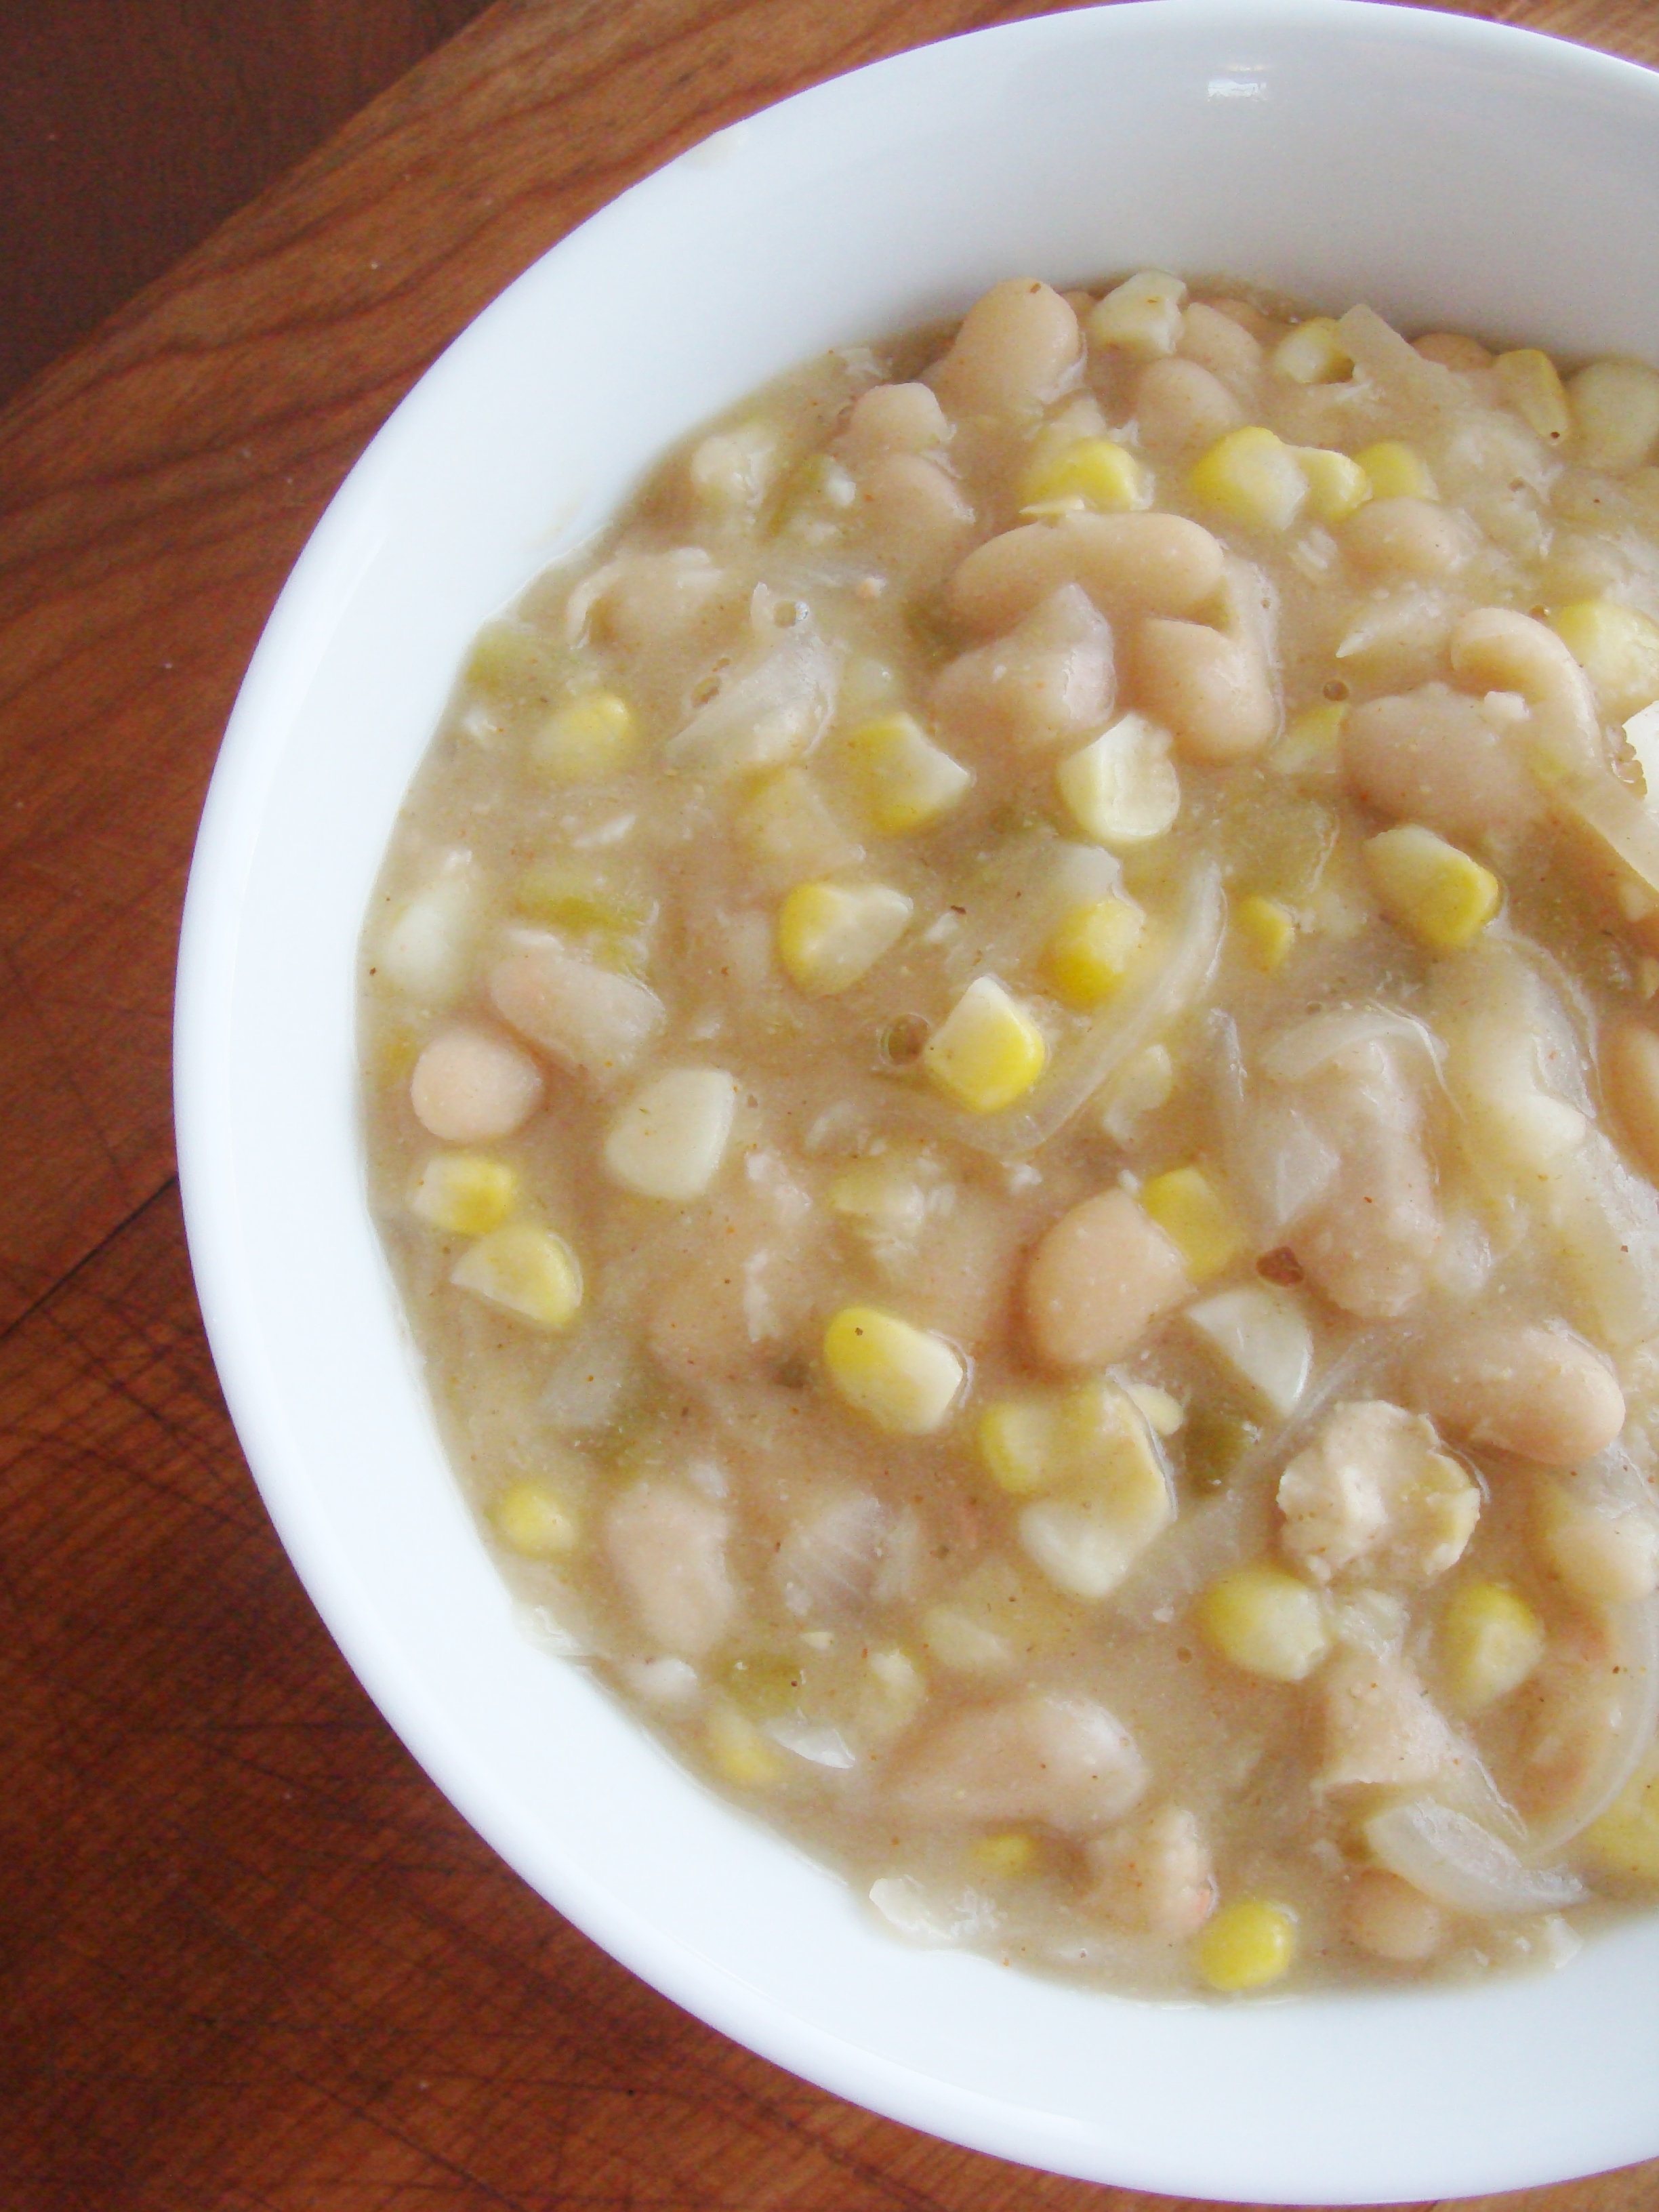
White Bean and Chicken Chili
Adapted from The Columbus Dispatch editors
What you need:
- 1 teaspoon olive oil
- 1 large onion, chopped
- 1 pound boneless and skinless chicken breasts
- 1 tablespoon minced garlic
- 1 can (15 oz.) great northern beans
- 1 can (15 oz.) cannellini beans
- 1 can (4.5 oz) green chilies (mild or hot, depending on your taste)
- 1 and 1/2 teaspoons ground cumin
- 1/8 teaspoon cayenne pepper
- 1 can (14 oz.) fat-free low-sodium chicken broth
- 2 tablespoons cornstarch
- 2 tablespoons water
- 1 can of sweet corn
- 1/2 C shredded Monterey Jack or cheddar cheese (optional garnish)
- 1/4 C reduced-fat sour cream (optional garnish)

What to do:
When I make this chili, I prepare all my ingredients first. Peel and chop the onion. Peel and mince the garlic. Cut the chicken into bite-sized pieces. Rinse and drain all of your beans, and drain the chiles. Ready?
Heat olive oil in a Dutch oven or large nonstick soup pot. Add your chopped onion to the pot, and stir to prevent sticking. Now add the chicken and garlic. Stir occasionally and allow the chicken to cook for 4-5 minutes. Add your corn, beans, and chilies to the pot. Then add the chicken broth, cumin, and cayenne pepper. Increase the heat to high. Cover the pot, and allow the chili to come to a boil.
While the chili is cooking, mix the cornstarch and water in a small plastic container with a lid. Shake well!
Add the cornstarch mixture to the chili a scoop at a time, stirring constantly to blend it in. Continue to let the chili boil until it reaches the thickness you prefer. Remove the chili from heat when you’re ready to serve.
Top with a dollop of sour cream and sprinkling of cheese.

Easy, satisfying chili!

Some notes:
This recipe will serve 2-3 very hungry people. I would double or triple the recipe for company, particularly if you want leftovers.
The chili freezes well.
If you prefer, you could cook your chicken breasts in the oven ahead of time and shred for the soup. Other options would be to use frozen chicken strips, like Tyson makes, or a rotisserie chicken.

I love stirring in the sour cream and cheese. So yummy.
